Key Takeaways
- Roaming Windows 10 Start Menu and Taskbar requires capturing registry keys, files, and the legacy TileDataLayer database (pre‑1709) or the CloudStore key (1709+), then syncing them after the user profile unloads.
- Ivanti Environment Manager provides personalization templates that synchronize Start Menu panels, taskbar pins, appearance settings, and file‑type associations across Windows 10 (1607‑1803) and Server 2016, with offline caching for remote users.
- Administrators can deploy policies to pin or remove Win32 apps, hide or uninstall UWP Store apps per user or device, and enforce consistent file‑type associations, ensuring a stable workspace despite device changes.
"Outlook is missing from my Start Menu."
"All of my pinned items are gone."
"I have just logged on to Windows 10 and everything looks different."

Roaming and persisting the user’s Windows 10 Start Menu and Taskbar is a constant challenge that gains complexity every time Microsoft releases a new Windows 10 update. Users are more mobile than ever, and, in many environments, they hop between physical and virtual workstations and sessions with a variety of Windows desktop and server versions. Providing a consistent look and feel to the user regardless of their platform is key to their productivity and your help desk service levels, and the first place they look for familiar applications and utilities are the Start menu and Taskbar.
The Start Menu in Windows 10 is very different to that in Windows 7. In addition to the changes in the interface, we now must also deal with UWP (Universal Windows Platform) applications, also known as Windows Store apps. This new breed of applications are present in the Start Menu at first logon on any Windows 10 device and items such as Cortana, Store and Edge are often seen as an unwanted distraction and even nuisance.
What Are These UWP Applications and Can They Be Removed?
Classic Win32 applications are installed through an MSI, and typically create a desktop shortcut linked to an executable in C:\Program Files and a registry key in HKLM and possibly HKCU. When a user logs on to this device the application is available to them and any personalization they apply to it will be stored in their user profile.
UWP applications come in two forms that reside in different locations:
System Apps live in C:\Windows\SystemApps. Microsoft Edge is an example and is system-wide. Microsoft makes it very challenging to remove these applications.
Windows Apps live in C:\Program Files\WindowsApps. These applications are provisioned to the user’s session at first logon. Yes, that means this “install” process repeats itself every time on a non-persistent desktop or session. They can be removed or hidden on a per-machine or per-user level. Details on how Ivanti Environment Manager can manage this for you can be found below.
Behind the Scenes of the Windows Start Menu
In any version of Windows 10 prior to 1709, Start Menu tiles were fully or partially stored in a Jet database (%localappdata%\TileDataLayer\Dataebase\vedatamodel.edb). This created a challenge as the database file is locked throughout the user session and only released after the user profile is unloaded. To provide support for roaming the Start Menu on these earlier Windows 10 versions, Ivanti Environment Manager hooks the profile notification module and will only trigger a sync once the profile is unloaded and the tiles are unlocked. Partially in 1703 and exclusively in 1709 the Start Menu handling is now encapsulated within the Cloud Store registry key: HKCU\Software\Microsoft\Windows\CurrentVersion\CloudStore
How Can Ivanti Help?
As the industry leader in user workspace management, Ivanti makes your Windows 10 migration smooth with minimal effort and expertise required. Read on to discover how Ivanti Environment Manager provides consistency in migrating and managing key areas of the Windows 10 profile, specifically the Start Menu, Taskbar, and File Type Associations.
Roaming the Windows 10 Start Menu Using Ivanti Environment Manager Personalization
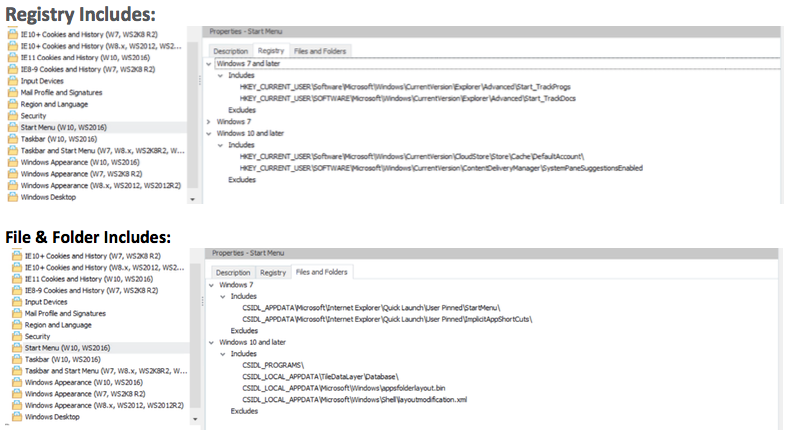
Out of the box, Environment Manager Personalization Server provides templates that capture the user’s Start Menu and Taskbar across and between all specified Windows 10 (1607, 1703, 1709, 1803) versions plus Windows Server 2016. Beginning with the Start Menu group, when enabled it will roam the following settings:
- Start menu panels
- Start menu panel resizing preferences
- Start menu properties (power settings, privacy & customised settings)
To capture and restore these settings at every logon the group is made up of a series of registry keys and files/folders. These items are synchronised via the Personalization Server (an IIS web service) to and from the Personalization Database (on a SQL Server):
Roaming the Windows 10 Taskbar Using Ivanti Environment Manager Personalization
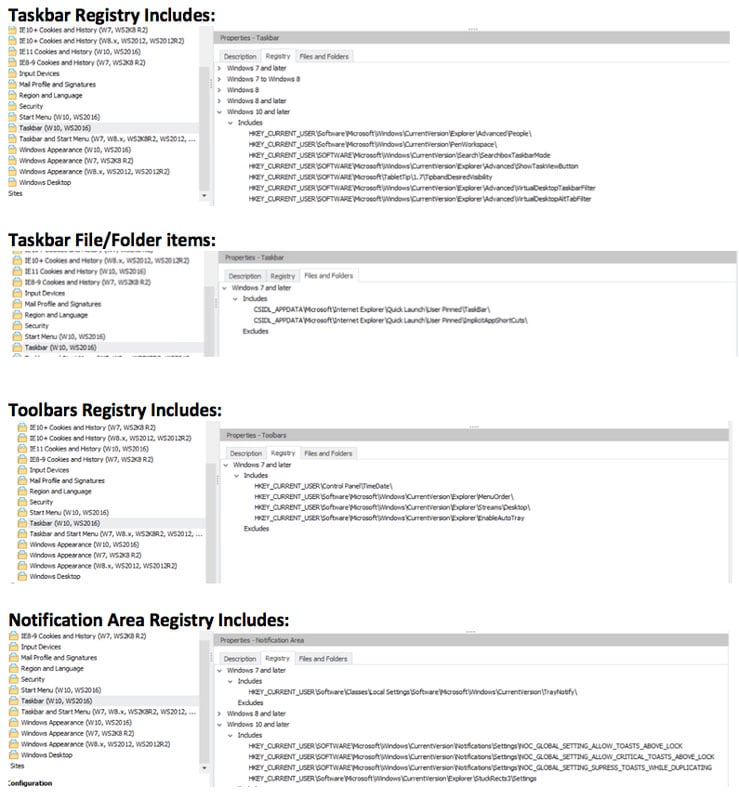
In Ivanti Environment Manager, the Windows Settings Group configuration for roaming the Taskbar is broken into three areas: Notification Area, Taskbar and Toolbars. Each area hosts its own set of Registry Keys and file/folder items. When the Windows Settings Group is applied, and all three areas enabled, the user will see the following settings roam between sessions:
- Taskbar pinned items
- Taskbar item position
- Taskbar item size
- Taskbar appearance (Aero peek, auto hide, group buttons, lock)
- Taskbar toolbar options (Address, Links, Desktop)
- Notification area (System Tray)
The managed items within each of these is shown below:
Note that this is the current template in the latest version of Ivanti Environment Manager, and we continually update personalization templates based on customer feedback, and in response to changes in Windows 10. We typically publish personalization template updates on the Ivanti Marketplace.
Applying the Personalization Configurations to Your End Users
Now we understand the composition of the Windows Settings Groups, the next step is enabling them for your users, so that they can roam between Windows environments safe in the knowledge that their Start menu and Taskbar settings will follow
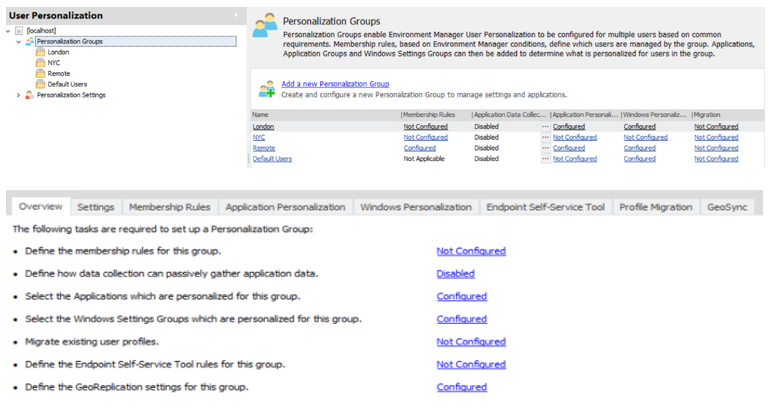
1. Create a Personalization Group:
A Personalization group is, in effect, a pool of users defined by a set of membership rules. If a user matches the membership rule(s) of a Personalization group, they will have a configuration file (XML) delivered to their client that tells the Environment Manager agent which applications and Windows settings to personalise. In this instance we are going to walk through the process of creating a Personalization Group and importing the Start Menu and Taskbar Windows Settings Groups to it:
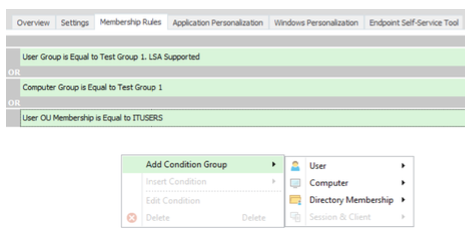
2. Defining Membership Rules:
You can define the combination of users and devices where the Personalization Group applies using Membership Rules that look up User & Computer conditions:
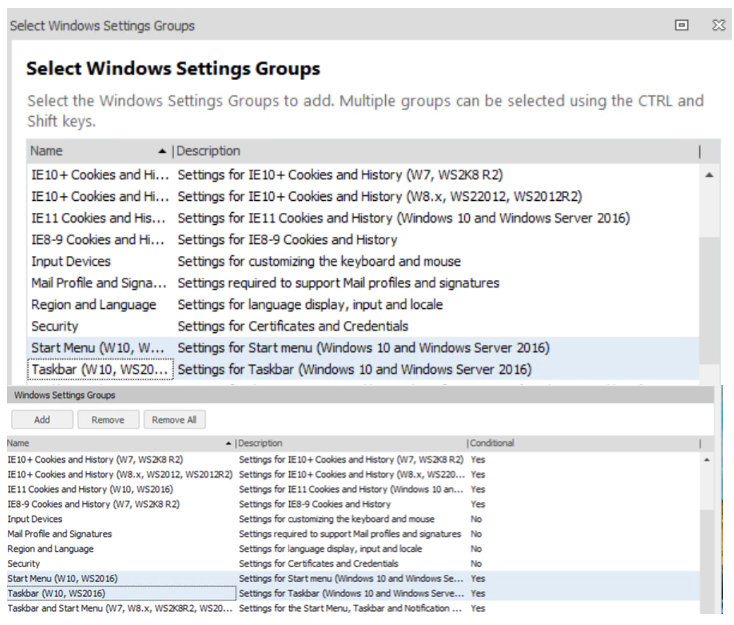
3. Apply the Start Menu & Taskbar Windows Settings Groups:
Personalization Server is shipped with numerous templates alongside the Start Menu & Taskbar items referenced in this blog. When building your Personalization Group configuration, you can simply select a number of these from the dialog shown below and they will be applied at next user logon to any user matching the specified membership rules:
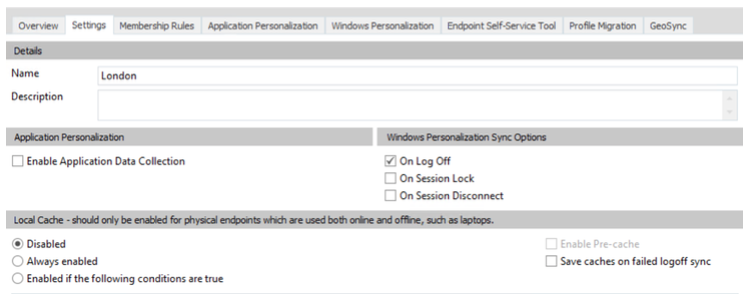
4. Select Your Sync Trigger(s) and Enable Offline Mode for Remote Users:
- Local Cache: In environments where remote users and unreliable network connections are a factor, Offline Mode ensures the consistent retention and delivery of user settings between sessions. Offline Mode provides an unrivalled level of resiliency by maintaining a local copy of the user’s cache regardless of network status or connection type. As soon as a network connection is established, the EM client will efficiently sync the data with the Personalization Server so the user can roam.
- Sync Options: Chose a trigger at which Personalization data is synced with the server providing flexibility in non-persistent environments where users may switch devices without a graceful logoff.
Adding and Removing Win32 Applications From Start Menu and Taskbar Using Environment Manager Policy
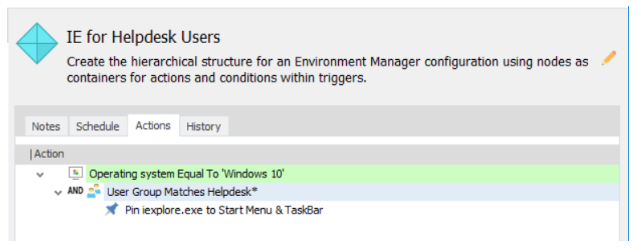
Every organization has essential applications: Finance may look straight to the taskbar for Excel whilst the Creative team expect Photoshop in the Start menu. With a simple Environment Manager policy action, you can add and remove applications from the user’s Start menu and Taskbar based on any number of conditions.
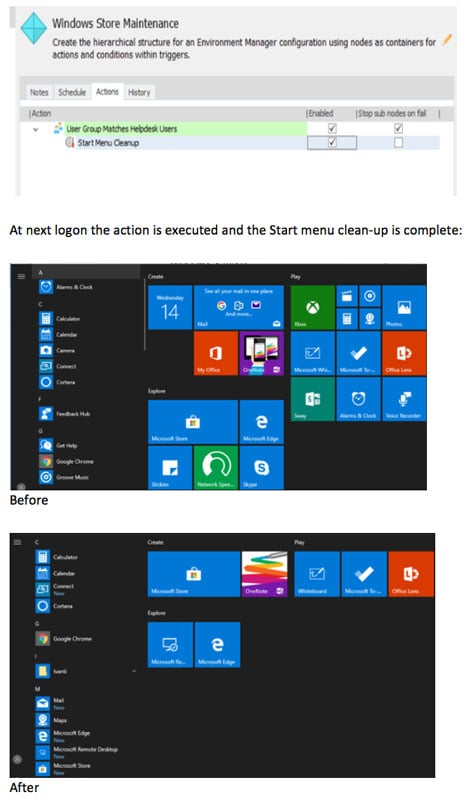
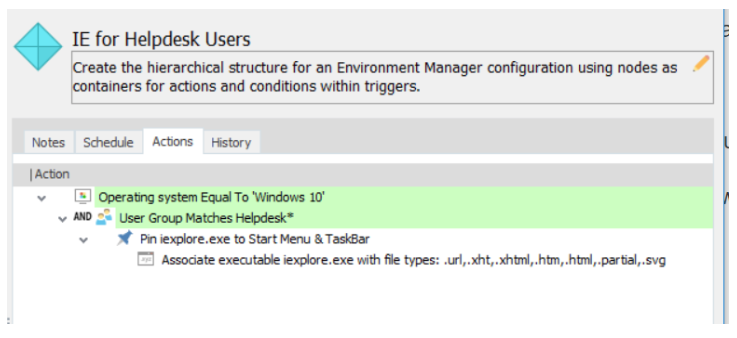
In the example below, I have set a policy in two simple steps to pin Internet Explorer to the Start menu and Taskbar of all users in the Helpdesk on Windows 10 machines:

Removing UWP (Windows Store) Applications From the Start Menu Using Environment Manager Policy
As discussed earlier in the blog UWP applications are a different beast when it comes to understanding their mechanics and limiting their disruption to the end user and their session.
Ivanti Environment Manager can help you strip out any of these unwanted Windows Store applications on a per-user basis on any version of Windows 10. In the example below, I have launched the Ivanti UWP Management Utility* and selected 12 items to remove for all Helpdesk staff:
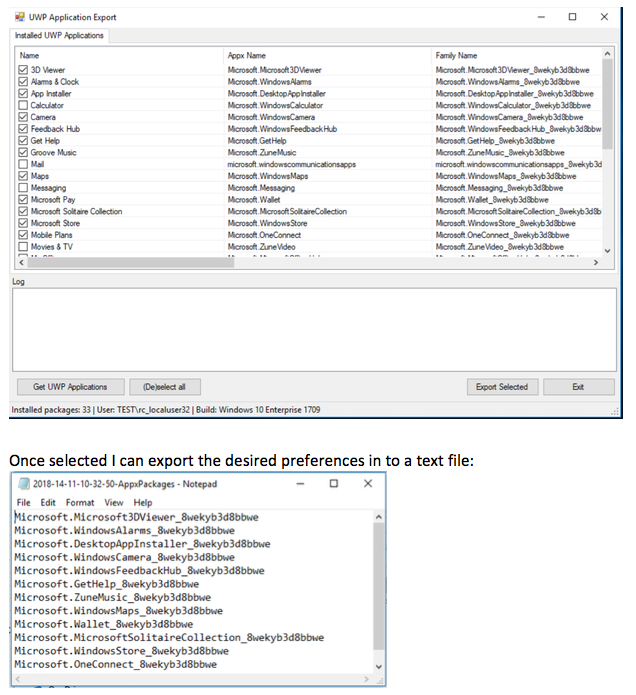
Using Environment Manager I can point a custom Powershell action to the text file executing the clean up on the Desktop Created trigger:
* Note: The above-mentioned FTA roaming configuration is currently going through community testing and will be added to the product as a full feature in a future release. Please see this Community link for more info.
File Type Association Roaming
A common user experience problem with Windows 10 has been that the user sets Adobe Reader as the default program for PDF files, they save their files and logoff for the day. The next day they login, open the PDF file and instead of Adobe's splash screen they get the default program dialog appear and Microsoft pushing them to use Edge instead!
The complexity behind persisting File Type Associations (FTA) on a per-user basis is all too apparent when one begins to explore the different moving parts. There is the OEMDefaultAssociations.xml file and its Alcatraz-like ACL's coupled with the application, device and user specific hash that is created every time you set a default association!
Thankfully Environment Manager can solve the FTA puzzle for you and provide your users with a consistent experience. The configuration can be used to persist the required associations across all versions of Windows 10 and Server 2016.
* Note: This configuration is currently going through community testing before it is added into the product or the Ivanti Marketplace. Please try it and give us your feedback!
Define User File Type Associations for the User
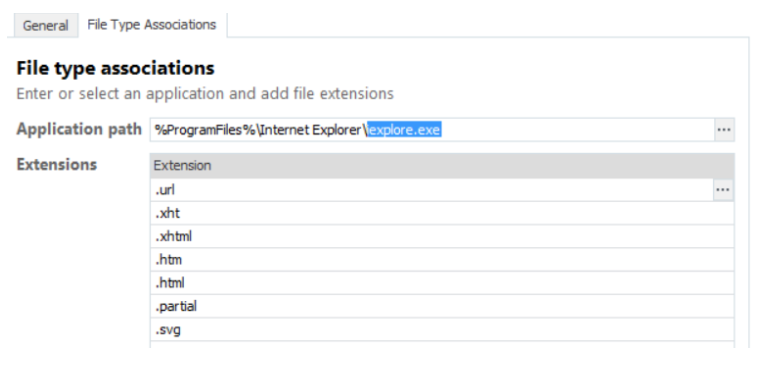
Environment Manager also provides the Administrator with the ability to define File Type Associations for the user. (Note that this is different from the ability to roam the user’s own FTA settings, described above.) Together they complete management FTA on Windows 10 and provide a consistent, managed user workspace.
In the screenshots below, I have extended the earlier example of pinning Internet Explorer to the Start menu and Taskbar for the Helpdesk group, by also setting the FTA to associate all relevant web files with IE:
Summary
This article only touches the surfaces of Ivanti’s capabilities when it comes to management of the Windows 10 user experience and profile. For a detailed overview of our supported Windows 10 platforms and version matrix please see this community item.
Help Us to Write the Next Chapter in Our Windows 10 Story!
We need our community of customers to tell us how we are doing and if we are solving the Windows 10 challenges you face daily. Please use the Ivanti Community to provide your feedback and suggestions directly to the UWM product teams.